Bathroom Planning Guide
Tub to Shower Conversions: 10 Mistakes to Avoid Before You Start
Plan smart. Avoid costly mistakes.
Tub to shower conversions sound simple at first. The old bathtub comes out, a new shower goes in, and the bathroom becomes easier to use. In real remodeling work, though, that small change can affect the layout, drain, waterproofing, tile, glass, inspections, and daily comfort of the room.
The biggest mistakes usually happen before demolition starts. Homeowners compare prices before the space is measured, choose finishes before the shower depth is confirmed, or assume the old tub drain is ready for a new shower. A good contractor should guide those decisions, but it still helps to understand the main planning points before you ask for quotes.
This guide walks through the most important things to check before a tub to shower conversion, so the finished shower fits the bathroom, drains correctly, protects the home, and works for everyday use. It is also useful if you are comparing a tub with shower combo, looking at a tub to shower conversion kit, wondering how to change a tub to a shower, or trying to understand tub to shower conversion cost before calling contractors.
1.Start With the Reason for the Conversion
Before you look at tile, shower glass, or fixture finishes, start with the reason you want to remove the bathtub. Some homeowners no longer need a tub because the kids are grown. Some want a lower step-in shower for comfort. Others are planning ahead for aging in place, improving the primary bathroom, or making a hall bath more practical.
That reason matters because it changes the design. A simple daily-use shower is different from a curbless shower planned for long-term accessibility. A guest bathroom may need a practical glass panel and easy cleaning. A primary bathroom may justify a larger shower, better storage, a bench, or a custom niche.
Before calling contractors, write down what the current tub does not solve. Then write down what the new shower must do better. That small step keeps the project focused and helps you avoid paying for upgrades that do not match the way you actually use the bathroom.
2.Measure the Bathroom Before Choosing Finishes
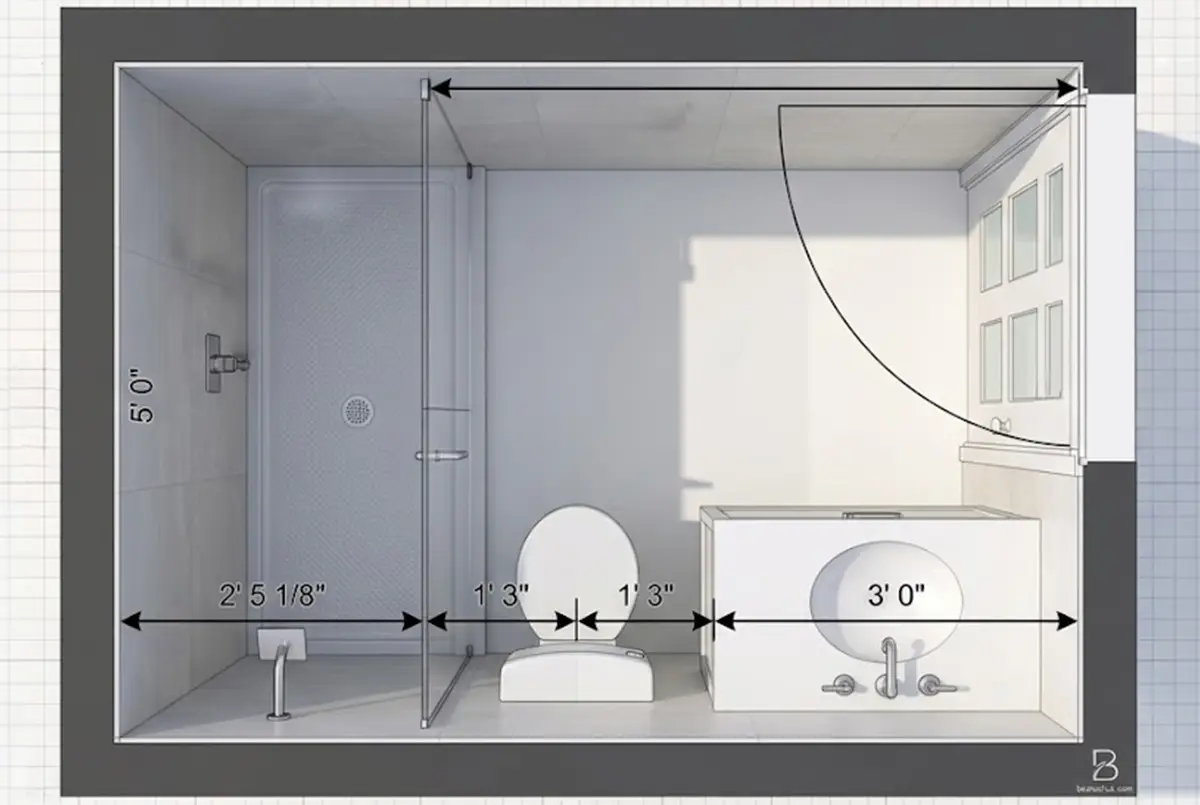
Many tub to shower conversion mistakes begin with layout. A standard bathtub is often around 60 inches long, but the depth can be tight. A tub with shower that feels acceptable with a curtain can feel cramped once a curb, tile, and glass are added.
Measure from the finished wall to the outside edge of the tub. Then measure nearby clearances, including the toilet centerline, vanity, door swing, trim, and any tight walkway areas. A common clearance guideline is 15 inches from the center of the toilet to each side obstruction, but local code and actual site conditions should always be checked.
If the old tub area is only about 27 inches deep, the finished shower can become much tighter after tile, backer board, waterproofing, curb, and glass are installed. In some bathrooms, gaining a few inches of shower depth may require changing the vanity, adjusting the toilet location, or expanding the project beyond a direct tub to shower replacement.
3.Do Not Assume the Existing Tub Drain Is Ready
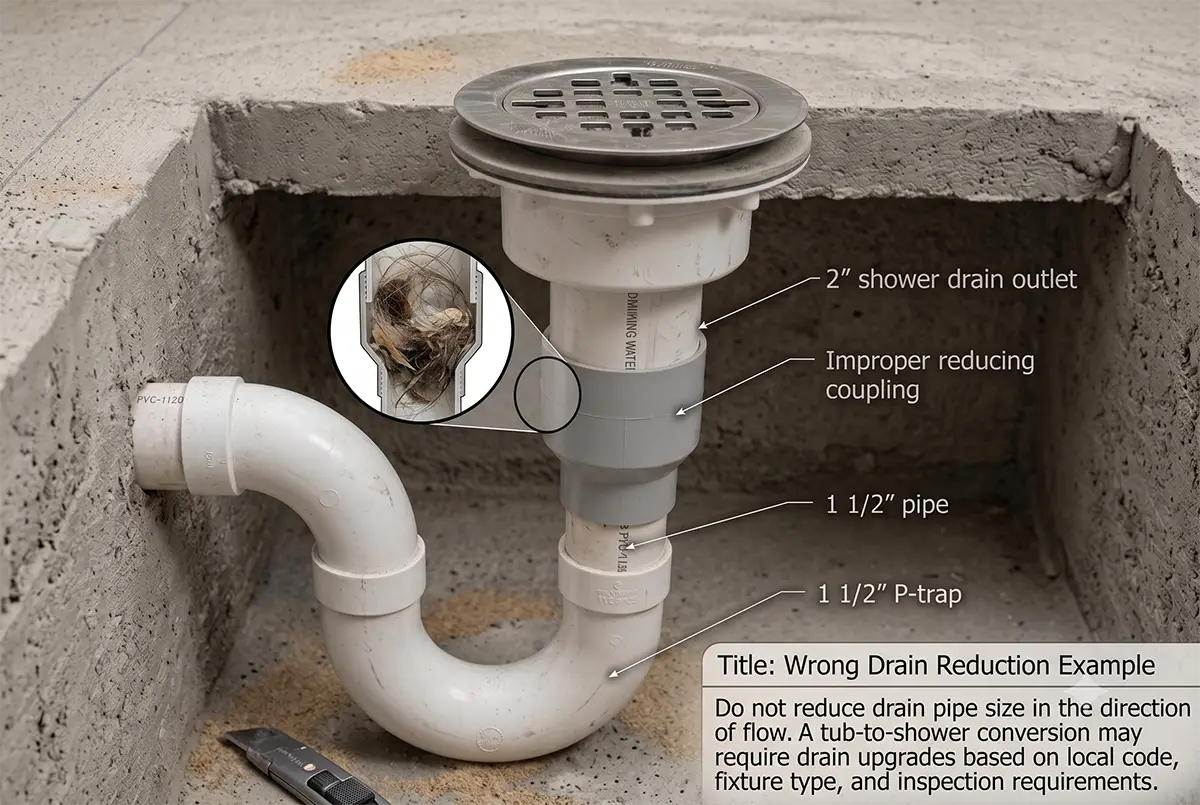
The drain is one of the most important parts of a tub to shower conversion. A bathtub drain is often smaller than what many shower systems require. In many areas, a shower drain is expected to be 2 inches, although requirements can vary by jurisdiction and fixture type.
The mistake is installing a new shower while quietly tying back into an old smaller tub drain without a real discussion. The shower may look finished, but water can drain slowly. That can leave you standing in water during normal use, especially with modern shower heads or larger shower floors.
Also be careful not to confuse a full conversion with small fixture repairs. Search terms like tub shower faucet, tub shower spout diverter, or how to fix tub to shower diverter usually describe a plumbing part issue, not a complete bathtub to walk in shower remodel.
Ask before work starts:
- Will the existing tub drain be upgraded or verified for shower use?
- What drain size is required for the selected shower system?
- Will plumbing rough-in be inspected if local code requires it?
- Will the wall or floor stay open until drain and valve work is approved?
4.Plan a Realistic Timeline
A tub to shower conversion is not always a two-day project. Some basic acrylic or panel systems can move quickly when the existing layout works and inspections are simple. A custom tile shower with plumbing changes, waterproofing, tile layout, niche framing, glass, and inspections takes more time.
A same-footprint conversion with straightforward materials may take about 5 to 7 business days when everything is ready and inspections are not delayed. A custom tile shower can take 1 to 3 weeks. If the project includes moving the toilet, resizing the vanity, changing rough-ins, updating electrical, or turning the work into a full bathroom remodel, 3 to 4 weeks or more can be realistic.
Inspection timing also matters. If the shower valve, drain, or framing is changed, the contractor may not be able to close the wall until the rough-in is approved. Waiting for an inspection can feel slow, but it protects the homeowner and documents that critical work was checked before it disappeared behind tile.
5.Choose Materials for Maintenance and Long-Term Use
Finishes should be selected for more than looks. Porcelain tile is a strong shower choice because it is dense, durable, and water-resistant. Ceramic, glass, stone, and other materials can also work, but each has different maintenance requirements and installation details.
The shower base is another major decision. Acrylic and solid-surface pans are often faster to install and easier to maintain. A custom tile pan gives more design flexibility. A curbless pan can be excellent for comfort and aging in place, but it requires careful planning so the bathroom floor, shower entry, and drain slope work together.
Some homeowners compare a tub to shower conversion kit with a custom tile shower. A kit can make sense for a simple budget project, but it still needs correct measurements, drain planning, wall prep, waterproofing details, and a clean fit at the existing opening.
The shower floor must direct water to the drain without feeling awkward underfoot. A common target is about 1/4 inch of slope per foot toward the drain, but the final plan should follow local code, the manufacturer instructions, and the actual drain location.
6.Waterproofing Is the Part You Cannot See Later
Tile and grout are not the waterproofing. They are the finished surface. The waterproofing is behind the tile and under the shower floor, and that hidden layer protects the framing, subfloor, ceiling below, and surrounding bathroom.
Before tile begins, ask what waterproofing system will be used. Sheet membranes, foam board systems, liquid membranes, and other approved systems can all perform well when they are installed correctly. The key is not just the brand. The key is whether the installer understands the system and follows its details from the pan to the corners, seams, niche, curb, and valve penetrations.
For more background, review Bathroom Waterproofing Systems before choosing the final shower assembly.
A 24-hour flood test is a reasonable expectation for many custom shower pans unless local code or manufacturer instructions require something different. Take photos before tile covers the work. A contractor who builds showers correctly should be able to explain the waterproofing steps clearly.
7.Plan the Tile Layout Before Tile Installation
A clean tile shower does not happen by accident. The layout should be planned before the first tile is installed. Otherwise, the shower can end up with small sliver cuts at the ceiling, floor, corners, niche, or glass edge.
This is especially important when using large-format tile, patterned tile, accent bands, or a recessed niche. The niche should not be placed only where the studs happen to be. When possible, it should line up with grout joints and fit the overall tile pattern. That may require additional framing, but it often creates a cleaner and stronger finished result.
Use the Shower Tile Layout Tool to test wall dimensions, tile size, grout spacing, pattern, and niche placement before installation starts.
8.Think Through Shower Glass Before the End
Glass is not just a final accessory. It affects entry width, splash control, toilet clearance, cleaning, and budget. Standard openings may allow more affordable tub to shower doors or fixed panels. Wider, angled, curbless, or out-of-square showers may require custom glass.
Before locking in the shower size, compare the common options: frameless, semi-frameless, sliding, hinged, bi-fold, fixed panel, and neo-angle glass. Bezruchuk’s Types of Shower Doors guide explains how each option affects function and appearance.
For curbless showers, avoid unnecessary penetrations through the waterproofed floor when possible. If drilling is required, holes should be cleaned and sealed correctly before hardware is installed. Silicone joints around glass should also be neat, consistent, and allowed to cure according to product instructions before the shower is used.
9.Use Silicone in Wet Corners
Inside shower corners should not be packed with grout and forgotten. Tile expands and contracts, and changes of plane need movement space. A proper 100 percent silicone joint can move with the tile and usually lasts longer in wet areas than regular acrylic caulk.
Silicone should be used carefully in corners, around glass, and around fixture penetrations. Valve trim, shower head arms, holders, and brackets should also be sealed in a way that helps prevent water from slipping behind the finished surface.
This is a small detail, but it matters. A shower can have beautiful tile and still fail early if wet corners and penetrations are treated like an afterthought.
10.Ask Practical Contractor Questions
The goal is not to hire the most expensive contractor. The goal is to hire someone who understands layout, plumbing, waterproofing, tile, glass, and inspections. The right questions can reveal how the project will actually be built.
Questions to ask before hiring:
- Will the existing tub drain be upgraded or verified for shower use?
- Who will perform the plumbing work?
- Will the plumbing be inspected if required?
- What waterproofing system will be used?
- Will the shower pan be flood tested before tile installation?
- How will the shower pan slope be confirmed?
- How will the tile layout be planned before installation?
- Where will the niche go, and will it line up with the tile?
- Will shower corners be finished with silicone instead of grout?
- What is included in the price, and what could become an extra cost?
Final Thought
A tub to shower conversion can be one of the best bathroom upgrades, but only when it is planned correctly. The finished shower should fit the room, fit the homeowner, drain properly, protect the structure, and feel comfortable for daily use.
Measure first. Confirm the drain. Ask about waterproofing. Plan the tile layout. Think through the glass before the end of the project. Those steps help you avoid expensive mistakes and make the new shower feel like it was built for the home, not forced into the old tub space.
Planning a conversion in Washington? Our Bellevue bathroom remodeling and Puyallup bathroom remodeling pages explain our local service scope. For a preliminary budget, use the bathroom remodel cost calculator before requesting a project-specific estimate.