Master Bathroom Remodel: From Water Damage to a Design Masterpiece
Turning Water Damage into a Design Opportunity
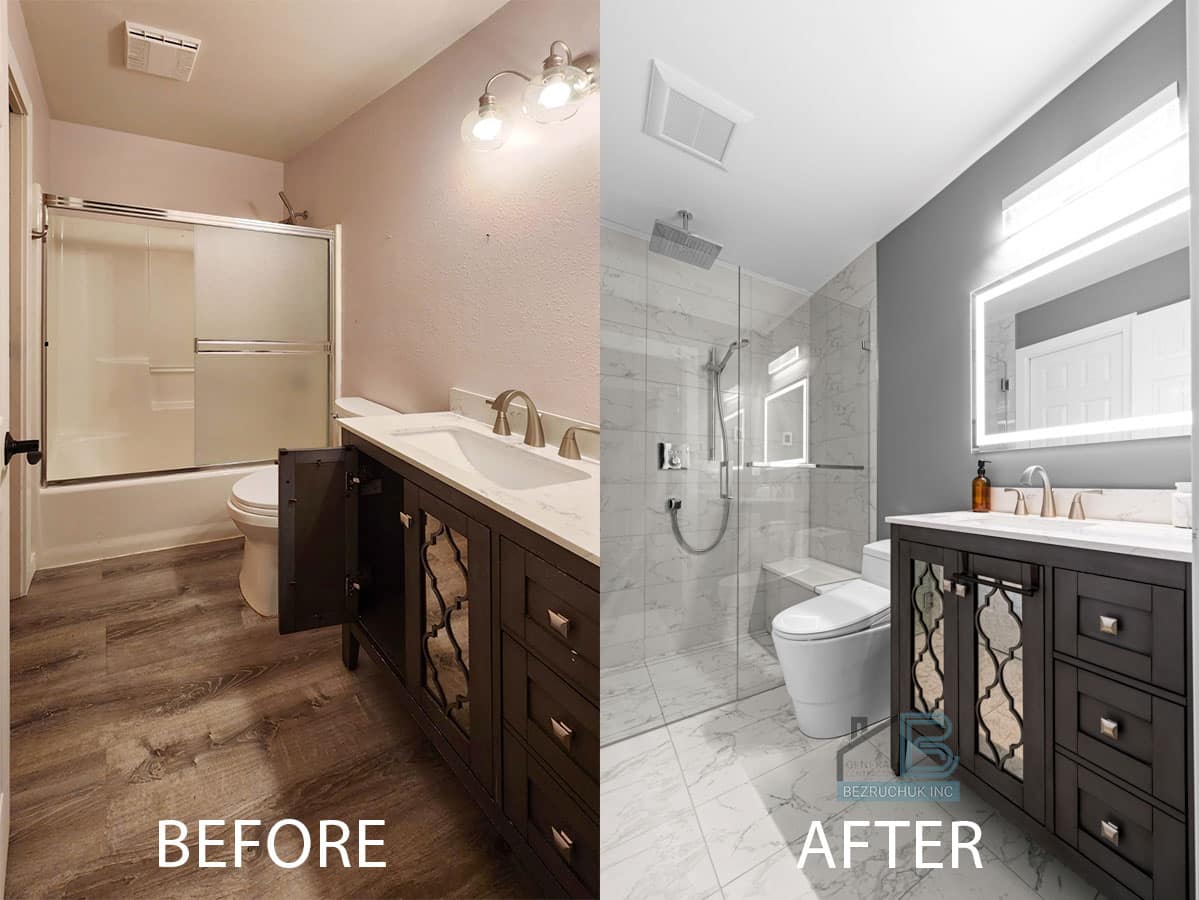
Sometimes, the best master bathroom remodel designs begin with an unexpected problem. In this case, the homeowners had watched the master bathroom deteriorate over time. A combination of aging materials and hidden water damage left the space looking tired—and feeling even worse. Instead of patching it up, we decided to rebuild it from the ground up.
This approach turned a frustrating issue into an exciting design opportunity. By stripping everything down to the studs, we were able to correct underlying problems and reimagine the layout entirely. The new design would need to be both beautiful and functional—something that could deliver a peaceful, spa-like bathroom experience every day.
Before construction began, we took the time to understand how the space was used. We considered traffic flow, lighting, and storage needs. These insights helped shape a more open, user-friendly layout, where we carefully planned and placed each element. The goal was not just to replace what was broken, but to create a space that felt intentional and inviting in master bathroom remodel.
From structural fixes to layout upgrades, the first stage of this remodel set the tone for everything that followed. This project began with a damaged, outdated bathroom quickly became the foundation for something far more elegant—and built to last.
💬 Ready to move beyond repairs? Get a free quote from a trusted general contractor and start planning your bathroom renovation with confidence.


Plumbing Upgrades: Replacing CPVC with PEX for Lasting Performance
While the visual elements of a remodel often steal the spotlight, plumbing is one of the most critical systems behind the walls. In this project, the root cause of the water damage was traced to a failed CPVC (chlorinated polyvinyl chloride) pipe. Over time, these rigid plastic pipes can become brittle, especially in areas with fluctuating temperatures or high pressure. Cracks or breaks in CPVC often lead to hidden leaks—and costly home improvement repairs.
To prevent future issues, we completely replaced the old CPVC with PEX (cross-linked polyethylene) piping throughout the bathroom. To enhance durability and flexibility, we replaced old CPVC pipes with PEX plumbing from Uponor, a leader in innovative piping solutions. We treated this upgrade as more than just a fix.—it was a forward-thinking investment in the home’s infrastructure.
PEX offers several advantages over traditional plastic or copper piping. It’s flexible, which allows for fewer connection points and easier installation through walls and floors. This flexibility also means it’s less likely to crack under stress or temperature shifts. In addition, PEX resists corrosion and doesn’t scale or pit like metal pipes, resulting in more consistent water pressure and fewer plumbing headaches down the road.
Making the switch from CPVC to PEX gave this bathroom a fresh start—not just in design, but in function. It eliminated the original source of damage and ensured that the upgraded fixtures would perform reliably for years to come. For any remodel, especially one involving older materials, upgrading the plumbing is a step that truly pays off over time.
💧 Stop water damage before it starts. Request a free estimate or learn more about smart plumbing upgrades in our South Puget Sound remodels.
Selecting Materials: Where Elegance Meets Performance
A well-designed bathroom is more than just good lighting and stylish fixtures—it’s about choosing materials that last. In this master bathroom remodel, the finishes were selected not just for how they look, but also for how they perform over time.
Natural Stone With a Modern Edge
For the shower walls and tub surround, the homeowners chose California Rocks Bianco Carrara Honed 12×24 tile. This natural stone brings a soft, elegant character to the space. With subtle veining and a honed finish, it adds texture without overpowering the room. It’s a classic look, yet it fits perfectly into a modern design.
The shower floor and shelf were finished with a coordinating 3-inch Bianco Carrara hex mosaic. This smaller format provides both traction and visual contrast. The hexagon shape adds a subtle detail that breaks up the clean lines in just the right way.
A Bold Foundation Underfoot
To ground the space, we used Brushed Metallic Charcoal 12×14 tile across the bathroom floor. This tile has a brushed surface that reflects light differently depending on the angle, adding depth and movement. Originally considered for a herringbone pattern, it was installed in a straight layout instead. This choice preserved the flow of the brushing and kept the design clean and cohesive.
We chose each material in this remodel with care—from natural stone to modern porcelain. Together, they create a balanced look that’s elegant, functional, and ready to stand the test of time.
🛁 Looking to combine elegance with durability? Get a personalized quote or view our premium material choices in Puyallup bathroom remodels.
Designing the Dream: Layouts, Renderings & Client Vision
A great remodel starts long before any tile is installed. It begins with a clear design process and a shared vision. In this project, 3D renderings played a key role in helping the homeowners make confident design decisions from the start.
Visualizing the Final Result
We began with layout renderings that allowed us to test different fixture placements, tile patterns, and lighting effects. These digital mockups offered a realistic preview of the space and gave the homeowners the freedom to explore options before committing.
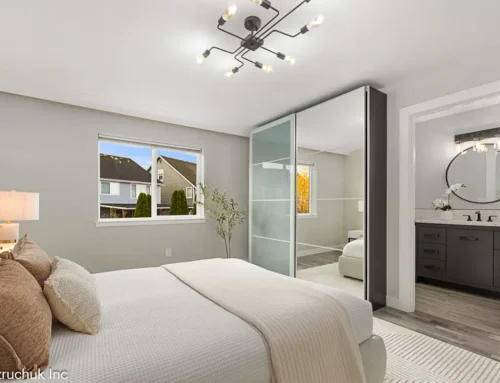
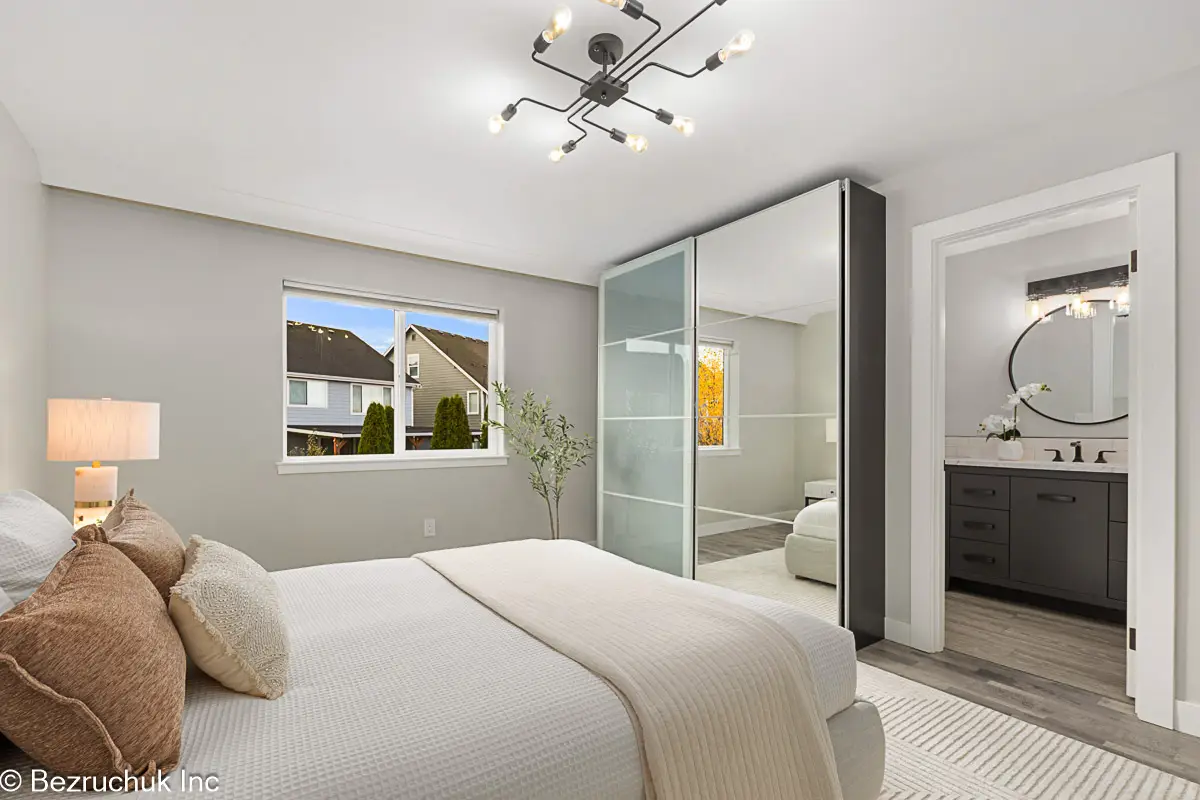
One standout decision came during the mirror layout. Instead of mounting wide LED mirrors horizontally, we flipped them vertically to add height and symmetry. This change brought balance to the double vanity area and aligned with the tall, clean lines of the surrounding tile.
Clean Layout, Better Flow
The updated layout also made better use of the space. The freestanding bathtub was centered under a large window to create a focal point. The shower was designed with glass panels to keep the room feeling open, while the toilet was tucked away for added privacy. These adjustments improved both the function and flow of the bathroom remodeling.
Refined by Details
We eliminated backsplash shelving to create a minimalist vanity wall. Recessed LED mirrors gave the space a built-in, custom look. Trim, lighting, and fixture spacing were refined down to the inch—all to ensure the final product didn’t just look good, but felt intentional from every angle.
In the end, the design wasn’t just beautiful on paper—it set the stage for everything that followed during construction.
📐 Want help visualizing your future bathroom space? Explore more bathroom layouts in Bellevue or get a free quote to start the process.


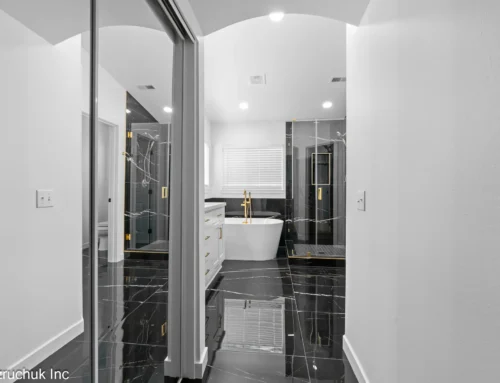
The Schluter System: Waterproofing Built to Last
Behind every beautiful bathroom is a solid foundation—and that starts with waterproofing. In this project, we used the Schluter-KERDI system throughout the shower area to ensure long-term protection and peace of mind.
Why Proper Waterproofing Matters
Bathrooms are high-moisture environments. Without proper waterproofing, even small leaks can lead to major issues over time. Mold, soft drywall, and subfloor damage are just a few of the risks. That’s why we take this phase seriously—it’s not just a background detail, it’s the backbone of the bathroom renovation.
A Fully Integrated Solution
We installed KERDI-Board on all shower walls, including around the custom bench and built-in niche. The shower base used a Schluter-KERDI tray with integrated slope, capped by a matte black KERDI drain system that complements the overall design. Every seam was sealed with KERDI-BAND, creating a continuous waterproof surface from floor to ceiling.
Clean Finish, No Compromises
Because the Schluter system is designed to pair seamlessly with tile, it created a clean, solid base for the Bianco Carrara stone. It also allowed us to build a floating bench and wrap it with Corian for a sleek, functional touch. The end result is a waterproofed shower that not only looks high-end but performs like it too.
🧱 Waterproofing is key to lasting results. Protect your remodel with a code-compliant solution or see how we apply Schluter systems in Seattle bathroom renovations.
Flawless Walls: Skim Coating, Texture, and the Perfect Paint Finish
While tile and fixtures often take center stage, walls play a big role in how finished a bathroom feels. That’s why we approach drywall work with the same level of care as any other part of the renovation. In this project, we made sure every wall was smooth, durable, and ready to support the new bathroom remodeling design.
Skim Coating for a Smooth Finish
After demolition and rough-in work, patching walls is expected. But instead of spot-repairing only the damaged areas, we applied a full skim coat across the room. This created a consistent surface and eliminated shadows or uneven textures that can appear under lighting.
No Hot Mud—No Cracks
Many contractors use fast-setting joint compound—also called “hot mud”—to speed up the process. But hot mud shrinks as it cures and often cracks over time, especially in high-moisture rooms like bathrooms. We never use it for finish coats. Instead, we rely on high-quality drying compounds that set slowly and evenly, giving you a more durable and flawless wall surface.
A Clean, Moisture-Resistant Paint Job
Once the skim coat was dry and the new texture applied, we used a moisture-resistant paint to finish the space. This paint holds up against steam and splashes while keeping its color and sheen. The final result was a clean, bright backdrop that let the bathroom and fixtures stand out without distraction.
🎨 Flawless walls make a flawless bathroom. Request your free estimate today or explore past remodel finishes in Bonney Lake.
Fixtures, Lighting & Finishing Touches In Master Bathroom Remodel
Once the foundation, tile, and walls were complete, it was time to bring the space to life. This is where style and function truly meet. Every fixture and fitting was selected to complement the interior design while enhancing everyday use.
Freestanding Tub with Statement Fixtures
The centerpiece of the bathroom is a freestanding bathtub, positioned beneath a large window for natural light and visual balance. Paired with a matte black, floor-mounted filler, the setup brings a spa-like calm to the room. It’s both bold and understated—a perfect match for the rest of the interior design.
Sleek Shower Features and Matte Black Accents
In the shower, we installed the Delta Vero system in a matte black finish. With both rainfall and handheld options, it offers flexibility and comfort. The black finish coordinates seamlessly with other elements in the bathroom, including towel bars, robe hooks, and toilet paper holders—creating a cohesive, modern look.
LED Mirrors and Layered Lighting
Above the double vanity, LED mirrors were installed vertically to enhance height and symmetry. These mirrors offer more than just reflection—they provide task lighting with a soft glow, ideal for daily routines. Recessed lights throughout the bathroom complete the setup, offering clean, even illumination without harsh shadows.
Finishing Details That Tie It Together
Trim work, baseboards, and custom casing around windows and doors added depth and craftsmanship to the project. These finishing touches, though subtle, help define the space and make it feel thoughtfully completed.
💡 From LED mirrors to bathtub replacement, we handle the details that matter. Get your free quote or view elegant remodels in Federal Way.
The Reveal: A Spa-Like Retreat Brought to Life
With every tile in place and the final fixtures installed, the vision became reality. What was once a worn and water-damaged bathroom now stood as a modern sanctuary—clean, bright, and inviting.
The transformation was immediately noticeable. The space felt larger, thanks to thoughtful layout changes and the use of glass and lighting. The freestanding tub, centered beneath the window, became a visual anchor. The soft marble tones, dark accents, and smooth walls created a calm, balanced atmosphere.
For the homeowners, the result was more than just a new bathroom. It was a daily upgrade in comfort and beauty. Every fixture worked exactly as it should. We tailored the lighting to suit both function and mood. Storage was more accessible, and traffic flow was smoother.
Just as important was the peace of mind that came with knowing the build quality was as solid as the design. Waterproofing, wall prep, and precision installation all contributed to a bathroom that’s built to last—not just impress.
A master bathroom remodel is a major investment, but this project proves that with the right team and a clear vision, the payoff is more than visual. It’s a better experience every day.
✨ Inspired by this transformation? See more renovation stories on our blog or get a no-pressure quote to begin planning yours.
Ready to Begin Your Own Master Bathroom Remodel?
Every successful remodel starts with a vision—and the right team to bring it to life. Whether you’re facing water damage or simply want a more beautiful and functional space, a well-executed bathroom renovation can elevate your home in ways you’ll feel every day.
From plumbing and waterproofing to tile design and lighting, this project shows what’s possible when every detail is treated with care. But the most rewarding part? Seeing how a fresh, intentional design can change how people feel in their home.
If you’re thinking about upgrading your bathroom—whether it’s a simple shower conversion or a full renovation—now’s the perfect time to start planning. We’re here to guide you through the process from concept to completion.
Before you schedule an appointment, we recommend using our bathroom remodel cost calculator to understand realistic budget ranges based on your bathroom size, layout, and finish choices.
📞 Don’t wait for problems to force a remodel. Get a free quote or explore shower conversions, bathtub upgrades, and more to start your renovation journey today.


Leave A Comment