Why LVP Flooring Installation Costs More Than Expected
Luxury vinyl plank flooring is often advertised as an easy, click-together flooring product. Because of that, many homeowners expect the LVP flooring installation cost to be only a few dollars per square foot.
Connecting the planks is usually one of the simplest parts of the installation. The work that determines the quality and final price happens before, around, and underneath the flooring.
A professional LVP project may require demolition, subfloor inspection, sanding, patching, floor-height corrections, trim work, transitions, stair preparation, furniture moving, detailed layout planning, and protection of the flooring’s locking system.
This guide explains what increases the cost of LVP flooring installation, why the cheapest quote may not include everything your home needs, and which product and installation mistakes can cause the flooring to fail later.
For a broader overview covering hardwood, engineered flooring, laminate, tile, and other flooring systems, read our guide to how much flooring installation costs.
Why Click-Together LVP Does Not Mean Cheap Installation
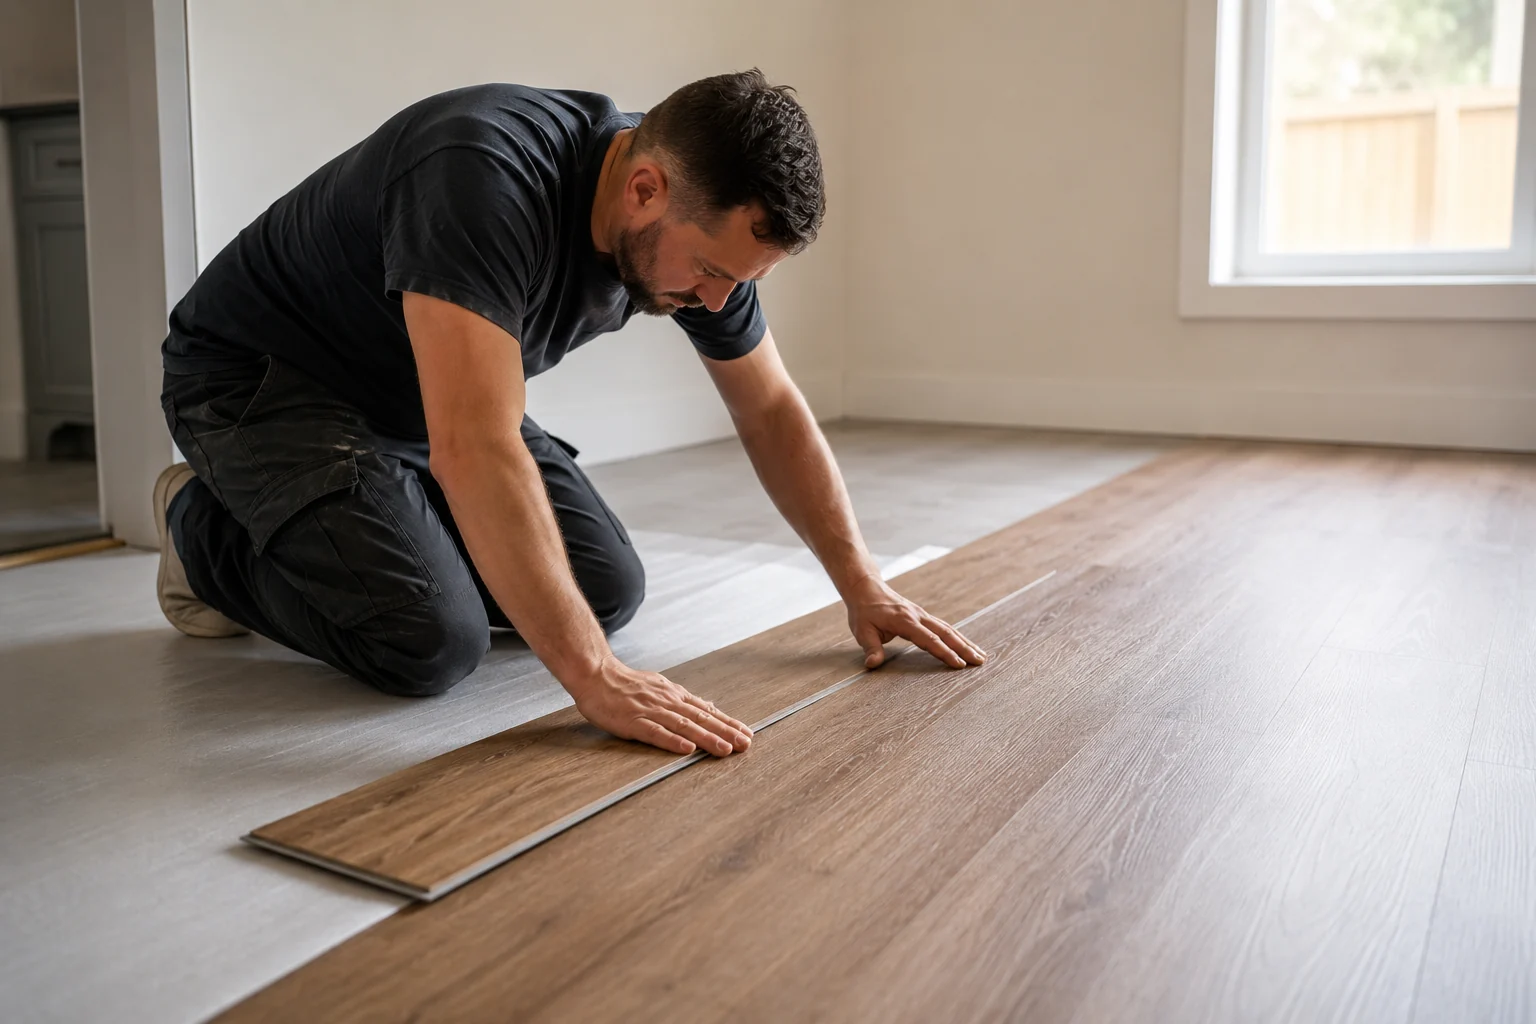
Modern LVP products are designed to connect without traditional nails or adhesive. This makes the flooring easier to assemble, but it does not eliminate the need for professional preparation.
Installing planks in the middle of an empty rectangular room may move quickly. The labor-intensive work is usually found around the room, beneath the flooring, and at every transition between different surfaces.
A complete professional LVP installation may include:
- Removing the existing flooring
- Removing carpet padding, tack strips, staples, and adhesive
- Hauling away demolition debris
- Inspecting the plywood or concrete subfloor
- Locating high spots and low areas
- Sanding, grinding, patching, or leveling the subfloor
- Securing loose or squeaking plywood
- Planning the direction and layout of the planks
- Undercutting door jambs
- Installing reducers, T-moldings, end caps, and stair noses
- Removing and reinstalling baseboards
- Installing shoe molding when baseboards remain
- Moving furniture and appliances
- Cleaning and protecting the finished floor
Two contractors can quote the same square footage and produce very different prices because they may not be including the same work. One proposal may cover only basic plank installation, while another accounts for everything needed to produce a complete and durable result.
Existing Flooring Removal Can Change the Installation Price
Before new LVP can be installed, the existing flooring may need to be removed. The demolition process depends on what is currently installed and how it is attached.
Carpet removal may appear simple, but the work also includes removing the padding, tack strips, staples, nails, damaged transitions, and any adhesive left on the subfloor.
Removing glued-down flooring, ceramic tile, laminate, engineered wood, or multiple layers of existing flooring can require significantly more labor and disposal.
Demolition pricing may be affected by:
- The type of existing flooring
- The number of flooring layers
- Whether the material is nailed, stapled, glued, or floating
- The amount of adhesive or thinset remaining
- The accessibility of the home
- The distance to the dumpster or work vehicle
- The weight and disposal cost of the removed material
- Whether furniture must be moved before demolition
The condition of the subfloor is also difficult to confirm until the existing flooring has been removed. A professional estimate should explain how concealed subfloor conditions will be evaluated and priced.
Subfloor Preparation Is Often the Biggest Cost Factor
Carpet and padding can hide minor variations because they are soft and flexible. LVP is a rigid flooring system with connected locking joints. Those joints require consistent support from the surface below.
After the carpet is removed, the plywood subfloor may have raised seams, swollen areas, low spots, loose panels, squeaks, old repairs, adhesive residue, staples, or damaged sections.
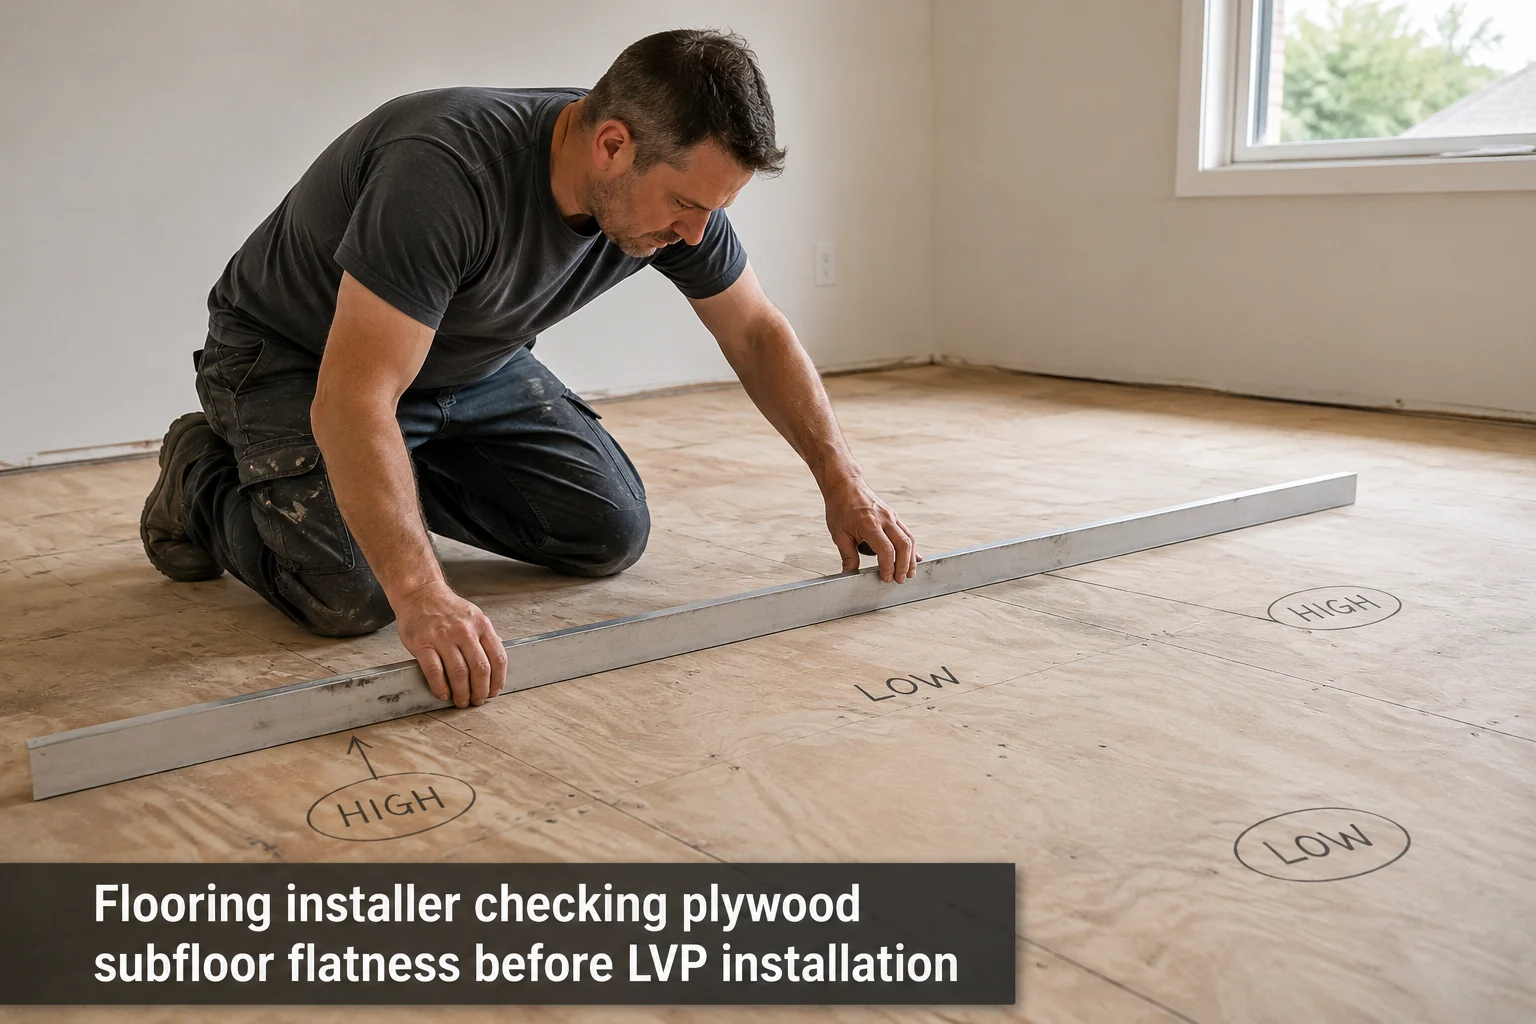
High spots in a plywood subfloor
High areas often develop along floor joists, plywood seams, patched sections, or areas that were previously exposed to moisture. These locations may need to be carefully sanded.
Sanding must be controlled so the subfloor remains structurally sound. Simply grinding down every raised area without understanding the cause can damage the plywood or create new low spots.
Low spots in the subfloor
Low areas may require an approved floor-patching material or self-leveling compound. The correct product depends on whether the subfloor is plywood, concrete, or another approved surface.
Many patching and leveling products also require a compatible primer. The subfloor must be clean and properly prepared before the primer and leveling material are applied.
Applying self-leveling compound without the correct primer or surface preparation can cause poor bonding, cracking, or separation.
Loose or squeaking plywood
Loose plywood may need to be secured before the new floor is installed. Additional screws or other approved fastening methods can help reduce movement and squeaking.
However, fastening alone will not correct damaged panels, structural movement, or problems caused by the framing below. Those conditions may require additional investigation.
This preparation adds labor and material cost, but it is also one of the most important parts of the installation. A beautiful plank cannot compensate for an improperly prepared subfloor.
Does an LVP Subfloor Need to Be Flat or Level?
Homeowners often hear the words “flat” and “level” used as though they mean the same thing. They describe two different conditions.
A level floor does not slope. A flat floor does not have abrupt humps, dips, ridges, or unsupported areas.
A floor can slope gradually from one side of a room to another and still be flat enough for certain LVP installations. In many cases, abrupt surface variations are more damaging to the locking system than a gradual slope.
The subfloor must meet the flatness requirements published by the selected flooring manufacturer. There is no single flatness specification that should automatically be applied to every LVP product.
A professional installer should review the manufacturer’s instructions and check the subfloor with an appropriate straightedge or measuring method before installation begins.
Skipping this step may reduce the initial estimate, but it increases the risk of movement, clicking sounds, raised edges, gaps, and broken locking joints later.
Why the Cheapest LVP Flooring May Cost More Later
Material price is an important part of the total luxury vinyl plank flooring installation cost, but the least expensive plank is not always the least expensive floor to own.
Low-priced LVP may have a thinner core, inconsistent manufacturing, limited pattern variation, weaker edges, a softer locking profile, or less stable construction.
These differences become especially important when the flooring will be installed continuously through multiple rooms, hallways, kitchens, and high-traffic areas.
When comparing LVP products, review:
- Total plank thickness
- Wear-layer thickness
- Core type and density
- Locking-profile design
- Attached-pad quality
- Plank width and length
- Surface texture
- Scratch and dent resistance
- Pattern repetition
- Installation requirements
- Maximum continuous installation dimensions
- Residential and commercial warranty terms
A stronger product cannot eliminate the need for preparation, but it can provide a more durable foundation for a properly installed floor.
Overall LVP Thickness and Wear-Layer Thickness Are Different
Homeowners frequently see flooring advertised as 12 mil, 20 mil, or another mil measurement and assume the number describes the overall thickness of the plank.
In most cases, the mil measurement refers to the wear layer at the top of the flooring. It does not describe the overall plank thickness.
One mil is one-thousandth of an inch. A 20-mil wear layer is approximately 0.5 millimeters thick. It is not the same as a plank that is 20 millimeters thick.
The overall plank thickness is normally listed separately in millimeters. For example, an LVP product may have an overall thickness of 6 millimeters or 8 millimeters while also having a 12-mil or 20-mil wear layer.
What the wear layer does
The wear layer helps protect the printed design and surface of the plank from everyday traffic, scratches, and abrasion.
A thicker wear layer can be useful in busy households or commercial environments, but it does not automatically make the core or locking system stronger.
What the overall thickness affects
The overall thickness may affect how the floor feels underfoot, how the locking edges are formed, how the floor aligns with adjacent surfaces, and how the product handles minor subfloor variations.
However, a thicker plank does not automatically mean the product has a better locking mechanism. Core quality, manufacturing precision, edge design, and proper subfloor support are equally important.
How LVP Thickness, Wear Layer, and Core Material Compare
Product labels can be confusing because overall plank thickness, wear-layer thickness, core construction, and locking-system quality are separate specifications. A thick wear layer does not automatically mean a thick plank, and a thick plank does not automatically guarantee a strong locking joint.
The ranges below are practical shopping categories rather than universal industry grades. Always compare the exact product data sheet and installation instructions before purchasing flooring.
| Product category | Typical total thickness | Typical wear layer | Common material or core | Best use | Professional caution |
|---|---|---|---|---|---|
| Entry-level click LVP | About 3.2–4.5 mm | About 4–6 mil | Thin rigid vinyl or entry-level SPC composite | Small bedrooms, offices, rental refreshes, and lighter-use rooms | The thinner locking edges provide less margin for subfloor variation, rough handling, and repeated movement. |
| Mid-grade rigid-core LVP | About 5–6.5 mm | About 12 mil | SPC with attached EVA or similar pad | Normal residential living areas, bedrooms, kitchens, and hallways | Still requires a flat subfloor and compliance with maximum-run and transition requirements. |
| High-performance rigid-core LVP | About 5–8 mm | About 20 mil or greater | Dense SPC or reinforced rigid polymer core | Busy households, pets, high-traffic areas, and larger connected spaces | A premium plank can still fail over an uneven subfloor or when the floating floor is pinned by cabinets or fixed objects. |
| WPC luxury vinyl plank | About 7–12 mm | Commonly 12–20 mil | Wood-plastic or polymer composite core | Bedrooms and living areas where comfort, warmth, and sound reduction matter | WPC can feel more comfortable, but some products are softer and may be more vulnerable to concentrated point loads or dents. |
| Glue-down LVT or LVP | About 2–3.5 mm | Commonly 12–20 mil | Flexible solid vinyl without a click-lock core | Large commercial areas, rolling loads, and projects where individual plank replacement matters | Because the material is thin, substrate preparation must be extremely smooth. Telegraphing from seams and defects is a major concern. |
Budget LVP Compared With Higher-Performance Product Lines
The following examples show why it is better to compare a specific collection or SKU instead of saying that an entire brand is good or bad. Most manufacturers sell multiple performance levels.
| Example product line | Total thickness | Wear layer | Core, pad, and lock | Published positioning or warranty | Our professional take |
|---|---|---|---|---|---|
| TrafficMaster Teak Trails Oak Budget example | 4.4 mm | 6 mil | Rigid-core, click-lock construction | DIY-oriented residential product sold as waterproof and resistant to everyday wear | Reasonable for a simple, light-use room when the subfloor is excellent. It would not be our first choice for a large continuous whole-house installation or demanding traffic. |
| Style Selections Slate Oak Budget example | 4.4 mm, including 1 mm attached pad | 6 mil urethane | Rigid floating plank with angle-angle locking system | Lowe’s categorizes the wear layer as light traffic; limited lifetime residential and 5-year commercial warranty | Suitable for basic residential applications and smaller rooms. The thin plank and light-traffic wear category offer less performance margin for a busy open-plan home. |
| Shaw Polaris Plus Mid-grade example | 5 mm, including 1 mm EVA pad | 12 mil | SPC, Fold-N-Tap profile, floating or direct glue | 30-year residential and 7-year commercial limited warranty | A more balanced residential option than entry-level 6-mil products. Good for normal household traffic when installed over a properly prepared subfloor. |
| Shaw Starting Line Higher-performance example | 6.5 mm | 20 mil | SPC with attached EVA pad; floating or direct glue | Lifetime residential limited warranty; promoted for dent and impact resistance | A stronger candidate for busy households, hallways, kitchens, and connected living areas, subject to the exact installation guide. |
| COREtec Pro Classics Higher-performance example | 5 mm | 20 mil | Solid polymer SPC core with attached cork; floating or direct glue | High-traffic positioning, lifetime residential wear warranty, and 15-year heavy commercial wear warranty | A strong whole-house and high-traffic candidate when the subfloor, expansion space, and transitions meet the manufacturer’s requirements. |
| Mohawk SolidTech R Plus Premium family | Varies by exact SKU | Varies by exact SKU | PVC-free rigid core made from recycled plastic and natural stone; Uniclic locking system | Lifetime WetProtect Gold floodproof coverage and manufacturer-reported scratch resistance exceeding traditional LVT | A premium family worth considering for long-term residential use, but the exact SKU data sheet must be reviewed before recommending it for a specific large-room layout. |
Research note: Product specifications and warranties were reviewed in July 2026 and may change. The comments above are professional application guidance, not a statement that every product from one brand will perform the same way. Always verify the exact model number, current installation guide, warranty, and approved room dimensions before ordering.
Why the LVP Locking Mechanism Matters
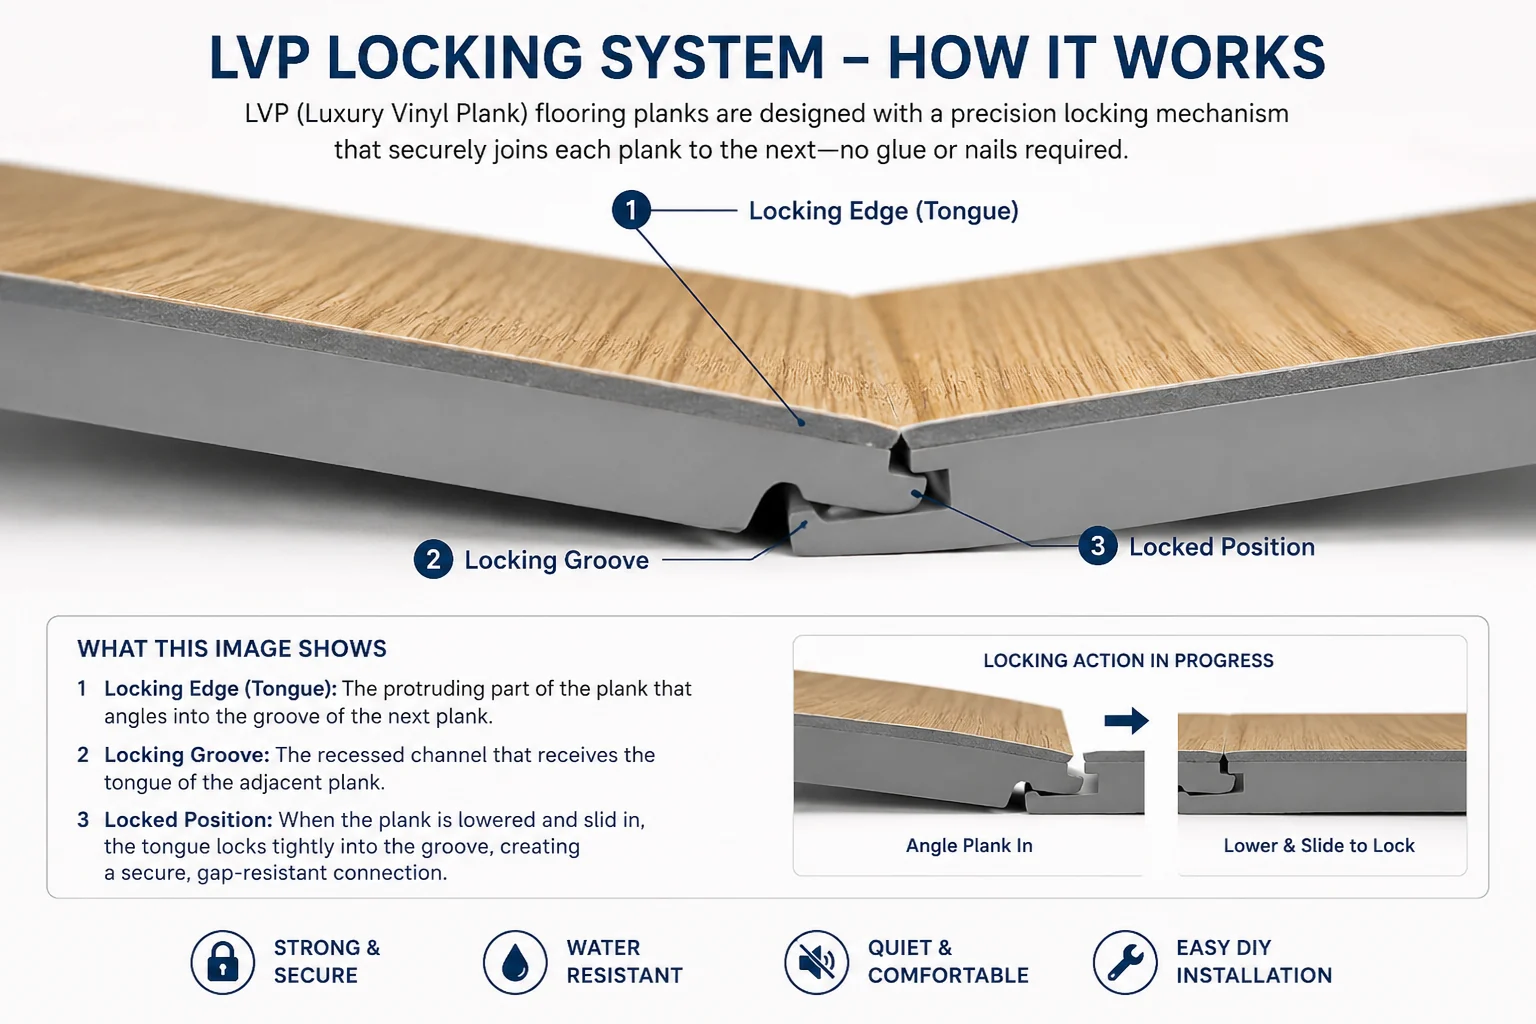
A floating LVP installation depends on hundreds or thousands of connected locking joints. Together, those joints allow the individual planks to function as one continuous floor.
The locking tabs are relatively small. They can perform well when the product is properly installed over a flat and stable subfloor, but they are not designed to compensate for unsupported areas or repeated vertical movement.
When a person walks over a low spot, the flooring may flex downward. When the weight is removed, it moves upward again. Repeating this movement can place stress on the locking edges.
Over time, excessive movement may contribute to:
- Gaps between planks
- Separated plank ends
- Broken locking tabs
- Clicking or popping sounds
- Raised edges
- Movement in doorways
- Failure in high-traffic areas
The product may be advertised as waterproof or highly durable, but those descriptions do not make the locking edges indestructible.
A durable installation requires a quality product, proper handling, correct subfloor preparation, required expansion space, and careful connection of every joint.
Finished Floor Height Is Commonly Missed in LVP Quotes
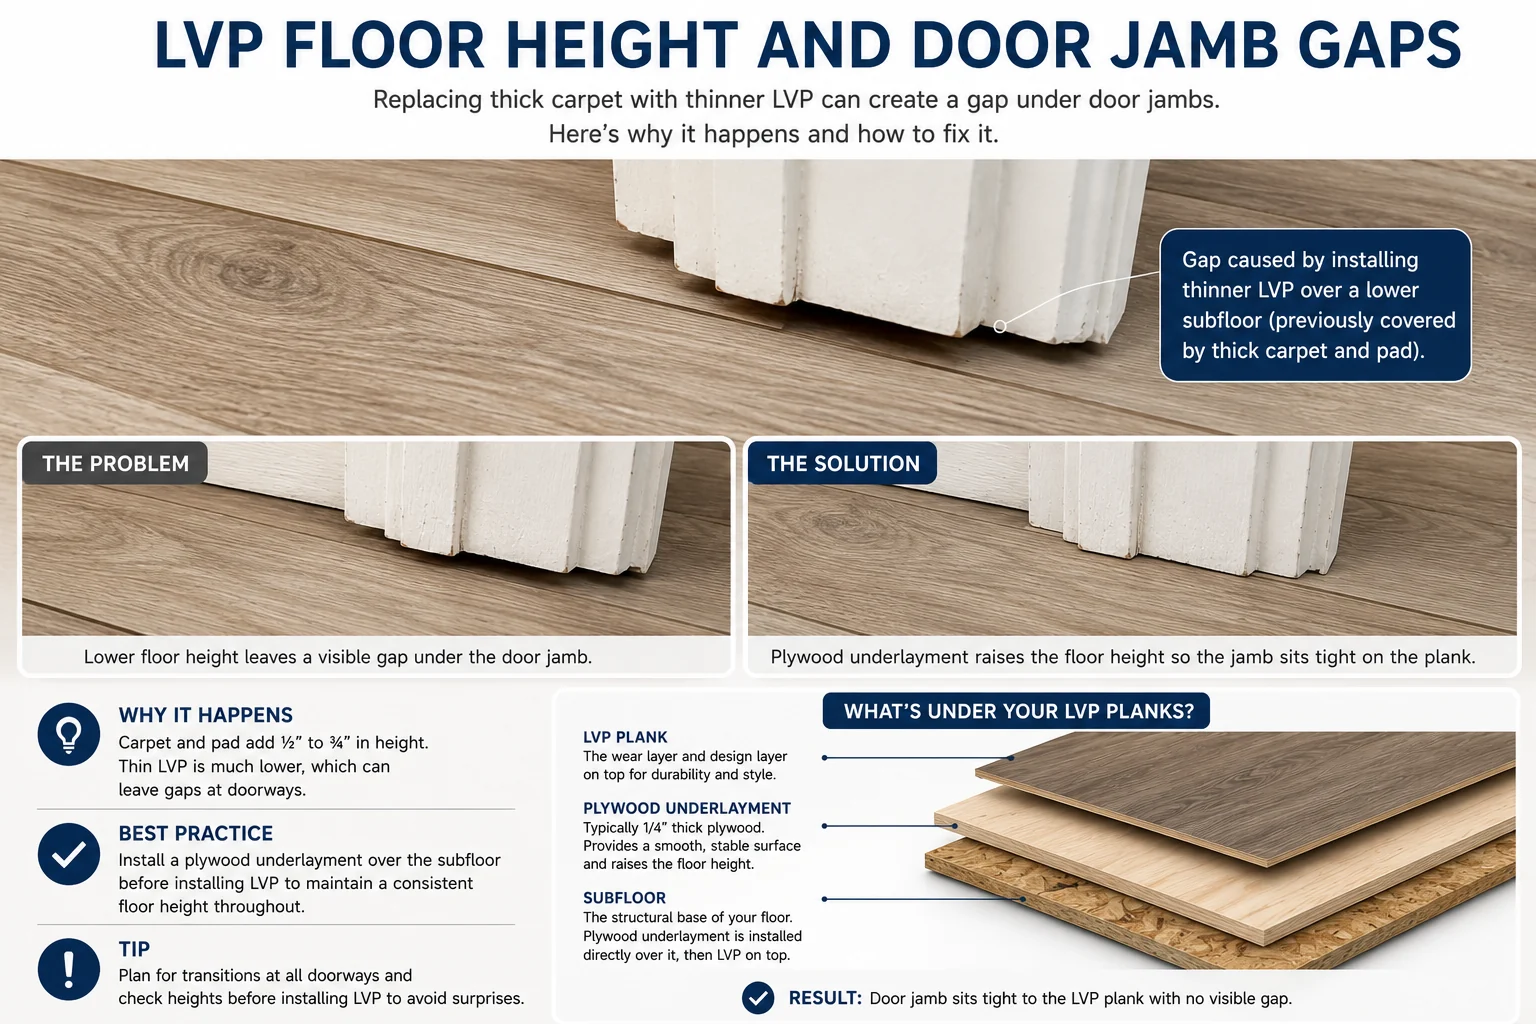
One of the most frequently overlooked issues is the thickness difference between the old flooring and the new LVP.
Carpet and padding may be one-half inch thick or more. Hardwood, tile, and other flooring assemblies can also create substantial finished height.
When those materials are removed and replaced with a 6-, 7-, or 8-millimeter LVP product, the new flooring may sit significantly lower than the original floor.
This can create visible or functional problems around:
- Door jambs
- Door casings
- Baseboards
- Exterior doors
- Sliding patio doors
- Transitions into tile or hardwood
- Kitchen cabinets and toe kicks
- Closet doors
- Dishwashers and other appliances
A large gap beneath a door casing is difficult to hide after the flooring has already been installed. Installing new baseboards may correct the perimeter appearance, but it does not automatically correct gaps beneath jambs and casings.
Using plywood to raise the floor
In some homes, the best solution is to install an approved plywood underlayment over the existing subfloor. This raises the finished floor elevation and may help the new LVP align more naturally with existing doors, trim, cabinets, and adjoining flooring.
This should not be confused with self-leveling. Leveling products are normally used to correct localized high and low areas. Plywood underlayment may be installed throughout the room to raise the overall floor elevation or create a suitable installation surface.
The plywood type, thickness, fastening schedule, seam placement, and compatibility with the selected flooring system must all be considered.
Particleboard is generally not our preferred material for this type of floor build-up. Its suitability should never be assumed without reviewing the complete flooring system and jobsite conditions.
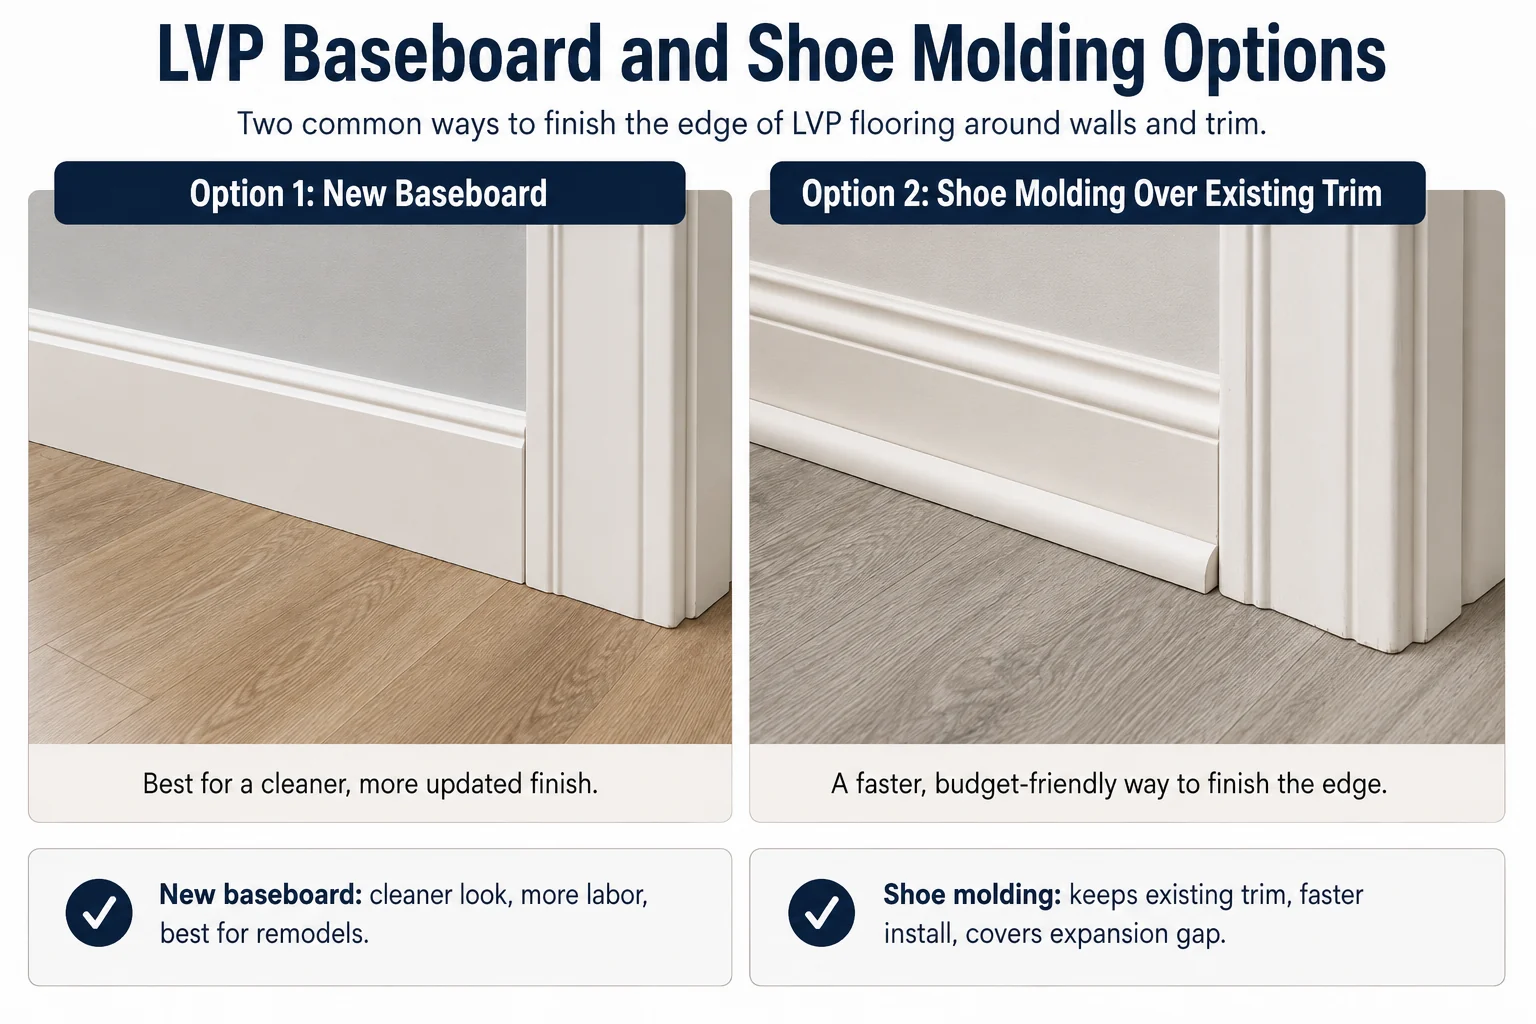
Baseboard Removal and Shoe Molding Affect the Quote
Carpet can often be tucked against an existing baseboard because the edge is soft and flexible. A floating LVP floor requires perimeter expansion space.
This space allows the flooring system to respond to normal environmental changes without becoming trapped against walls, trim, cabinets, or other fixed objects.
A quarter-inch expansion gap is common, but it is not a universal requirement. The exact perimeter space must follow the instructions for the selected product.
Option 1: Remove and reinstall or replace the baseboards
Removing the existing baseboards normally creates the cleanest finished appearance. The flooring can be installed beneath the trim while maintaining the required expansion space.
The additional scope may include:
- Careful removal of the existing baseboards
- Removal of caulk and old fasteners
- Replacement of damaged pieces
- Installation of new baseboard material
- Inside and outside corner cuts
- Caulking
- Nail-hole filling
- Painting or stain touch-ups
Existing baseboards do not always come off cleanly. Older, brittle, heavily caulked, or previously repaired trim may crack during removal.
Option 2: Keep the baseboards and add shoe molding
Shoe molding or quarter-round can sometimes cover the perimeter expansion space without removing the existing baseboards.
This may reduce labor and preserve tall, decorative, or difficult-to-replace trim. The shoe molding may be painted to match the baseboard or selected to coordinate with the flooring.
However, shoe molding changes the appearance of the room and does not work equally well with every baseboard profile.
The flooring quote should clearly state whether baseboard removal, baseboard replacement, shoe molding, caulking, and painting are included.
Doorways, Transitions, and Detailed Cuts Add Labor
Large open sections of flooring can often be installed efficiently. Doorways, closets, hallways, cabinets, fireplaces, railings, posts, angled walls, and exterior doors require significantly more measuring and cutting.
A complete installation may require:
- Undercutting door jambs and casings
- Removing old transition strips
- Installing reducers between different floor heights
- Installing T-moldings between similar-height floors
- Installing end caps near carpet or exterior doors
- Cutting around cabinets and built-ins
- Cutting around pipes, vents, posts, and railings
- Correcting floor-height differences between rooms
- Coordinating the layout through hallways and connected spaces
Manufacturer-matched transitions and stair noses may also cost more than homeowners expect. The price, availability, freight, lead time, and color match should be confirmed before installation.
Some LVP manufacturers also limit the maximum size of a continuous floating installation or require transitions in specific locations.
Running one uninterrupted floor throughout an entire house should not be assumed until the product instructions, room dimensions, fixed objects, and environmental conditions have been reviewed.
LVP Installation on Stairs Is a Separate Scope of Work
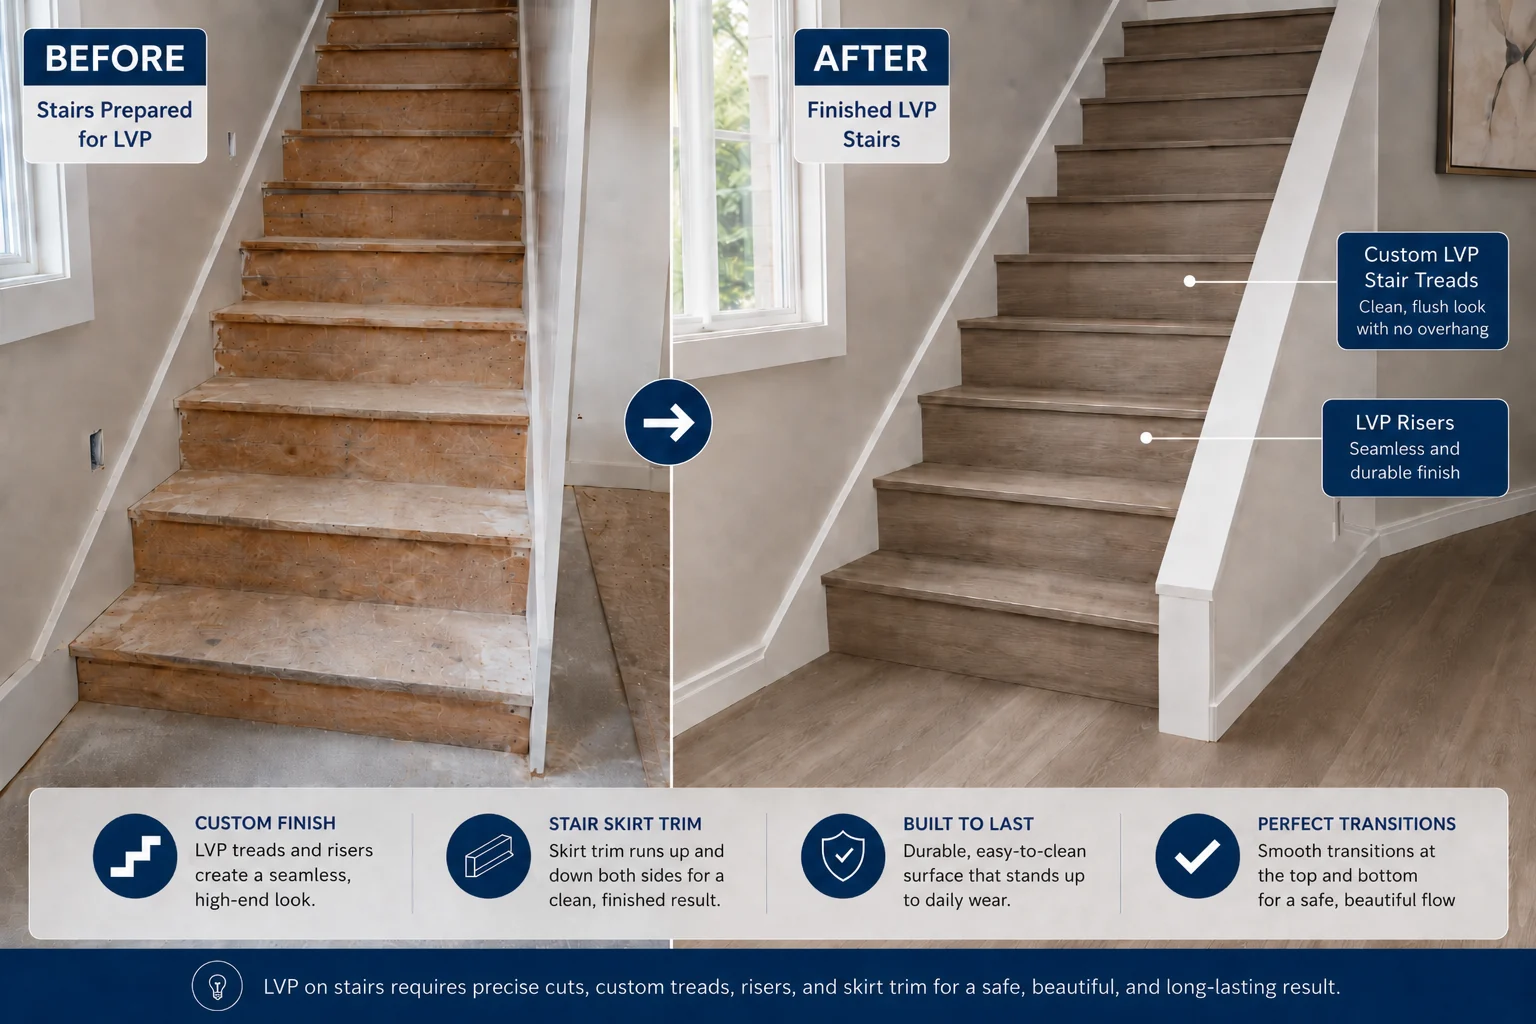
Stairs should not be priced as ordinary flooring square footage. Every tread, riser, exposed edge, and stair nose requires individual preparation, measuring, cutting, fitting, and fastening.
Stair preparation may include:
- Removing carpet and padding
- Removing tack strips, staples, nails, and adhesive
- Repairing damaged treads or risers
- Removing or modifying existing nosing
- Correcting inconsistent surfaces
- Preparing exposed stair edges
Common LVP stair options include:
- Standard overlapping stair noses
- Flush stair noses
- Manufacturer-made full stair treads
- Custom wrapped treads
- Mitered or waterfall-style LVP stair details
- Matching LVP risers
- Painted or wood risers combined with LVP treads
Each option creates a different appearance, material cost, preparation requirement, and installation method.
Open-sided stairs, exposed stringers, landings, railings, and angled steps add another level of detail.
Stair work is commonly priced by the tread, by the flight, or as a separate project allowance rather than being included in the standard LVP installation rate.
Furniture, Appliances, and Occupied Homes Increase Labor
A vacant home is usually faster and easier to floor than a fully furnished and occupied house.
When furniture remains in the home, the project may need to be completed in stages. Items may be moved from one room to another and moved again after each area is finished.
Additional work may include:
- Moving furniture between rooms
- Disassembling and reassembling beds
- Moving large tables, cabinets, or shelving
- Moving refrigerators and ranges
- Moving washers and dryers
- Removing and resetting toilets
- Disconnecting and reconnecting appliances
- Protecting countertops, cabinets, walls, and finished areas
- Maintaining safe access for occupants and pets
- Cleaning the work area at the end of each phase
Heavy, fragile, valuable, or specialized items may require a separate moving company. Pianos, safes, aquariums, medical equipment, and oversized furniture should be discussed before the estimate is finalized.
The proposal should clearly identify what the flooring company will move and what the homeowner must remove before work begins.
Moisture and Environmental Conditions Matter
LVP is frequently marketed as waterproof. That does not mean the complete floor assembly or room becomes waterproof after installation.
Water can still travel around the perimeter, beneath transitions, through plumbing penetrations, under cabinets, and below the flooring.
Concrete slabs may require moisture testing or an approved vapor-control system. Wood subfloors should be inspected for swelling, staining, water damage, rot, and excessive moisture.
Moisture-related planning is particularly important in:
- Basements
- Bathrooms
- Laundry rooms
- Kitchens
- Mudrooms
- Entry areas
- Homes with known plumbing or drainage problems
The installer must also confirm whether the LVP has an attached pad and whether the manufacturer allows an additional underlayment.
Adding an unapproved soft underlayment beneath a product with an attached pad may create excessive movement and place additional stress on the locking joints.
Temperature and indoor conditions should also remain within the range required by the flooring manufacturer before, during, and after installation.
Floating LVP Should Not Be Trapped by Fixed Objects
A floating floor must be able to move as one connected system. Permanent objects can interfere with that movement when they are installed directly on top of the flooring.
Depending on the manufacturer’s instructions, floating LVP may not be suitable beneath permanent kitchen cabinets, islands, built-in shelving, partition walls, or other fixed structures.
Installing heavy permanent objects over the flooring can pin the floor in place. This may contribute to buckling, separation, or excessive stress in other areas.
The flooring plan should be coordinated with cabinet installation, remodeling work, appliances, and built-ins before the planks are installed.
Layout Planning and Material Waste Affect the Final Price
Flooring should not be ordered using only the exact measured square footage of the rooms.
Additional material is needed for cuts, damaged boards, pattern selection, closets, angled walls, stairs, and future repairs.
The appropriate waste allowance depends on:
- The number and shape of the rooms
- Hallways and closets
- Diagonal or specialty layouts
- Plank width and length
- Pattern repetition
- Stairs and landings
- The number of doorways
- Angled walls and detailed cuts
- The desired starting and ending plank widths
Layout planning helps prevent narrow strips along visible walls, repetitive printed patterns, extremely short end pieces, and awkward transitions between connected rooms.
The installer may need to adjust the starting line or trim the first row to create a more balanced final appearance.
This work is easy to overlook because it happens before much of the flooring is installed, but it has a major effect on the finished result.
How Much Does LVP Flooring Installation Cost per Square Foot?
Homeowners searching for LVP flooring installation cost per square foot often expect one rate to cover every type of project.
In practice, a basic square-foot rate normally applies only to a defined scope. It may assume an empty rectangular room, an installation-ready subfloor, minimal cuts, and no stairs or complicated transitions.
A basic installation rate may not include:
- Existing flooring removal
- Material disposal
- Subfloor sanding or grinding
- Floor patching or self-leveling
- Plywood underlayment
- Moisture mitigation
- Baseboard removal or replacement
- Shoe molding
- Transitions and stair noses
- Door-jamb modifications
- Furniture and appliance moving
- Toilet removal and resetting
- Stair installation
- Painting or trim touch-ups
For a broader explanation of labor, demolition, preparation, materials, and installation pricing across multiple flooring types, review our complete flooring installation cost guide.
The lowest advertised square-foot rate is not always the lowest final project cost. Homeowners should request a written proposal showing exactly what is included and how additional preparation will be handled.
Why the Cheapest LVP Installation Quote Can Be Risky
A low quote is not automatically a bad quote. The concern is whether the price is low because important preparation and finishing work has been excluded.
A contractor may quote only the visible installation labor while leaving demolition, floor preparation, transitions, trim, furniture, and stairs as additional charges.
Another contractor may include realistic allowances for the work required to deliver a complete floor.
Before accepting an LVP installation proposal, ask:
- Is existing flooring removal included?
- Is debris disposal included?
- How will the subfloor be inspected?
- How will high and low areas be handled?
- Is floor preparation included or priced separately?
- Will the selected manufacturer’s installation requirements be followed?
- Are baseboards being removed?
- Is shoe molding included?
- Who supplies the transitions and stair noses?
- Will the door jambs be undercut?
- How will differences in finished floor height be handled?
- Are furniture and appliance moving included?
- Are stairs included?
- What workmanship warranty is provided?
- Which conditions are specifically excluded?
An inexpensive installation can become costly when locking joints fail, gaps develop, trim must be corrected, or large sections of flooring need to be removed and reinstalled.
Subfloor preparation is not the most visible or exciting part of a flooring project, but it often determines how the floor performs several years later.
What a Professional LVP Flooring Quote Should Include
To compare flooring proposals accurately, compare the complete scopes of work—not only the total price.
A detailed LVP flooring quote should address:
- Measured project square footage
- Flooring quantities and waste allowance
- Existing flooring removal
- Demolition debris disposal
- Subfloor inspection
- Subfloor preparation allowances
- Additional preparation rates
- Plywood underlayment or floor-height build-up
- Moisture testing or vapor protection when required
- Approved underlayment installation
- LVP installation method
- Baseboard removal or replacement
- Shoe molding installation
- Door-jamb and casing work
- Transitions, reducers, and end caps
- Stairs and landings
- Furniture and appliance moving
- Toilet removal and resetting
- Cleanup and final protection
- Product warranty information
- Workmanship warranty information
- Clearly written exclusions
When these details are missing, two proposals that appear to cover the same project may actually represent completely different levels of preparation and service.
Learn more about Bezruchuk Inc. professional flooring installation services, including luxury vinyl plank, hardwood, engineered flooring, laminate, stairs, trim, and subfloor preparation.
Frequently Asked Questions About LVP Flooring Installation Cost
Why is professional LVP flooring installation more expensive than expected?
Professional installation often includes much more than connecting the planks. Demolition, disposal, subfloor preparation, floor-height corrections, trim, transitions, stairs, furniture moving, layout planning, and detailed cutting can represent a substantial part of the project.
Does the subfloor need to be perfectly level for LVP?
Not necessarily. The subfloor must meet the selected manufacturer’s flatness requirements. A gradual slope may be acceptable, while abrupt humps, ridges, and dips can create movement and stress the locking system.
Is 20-mil LVP flooring 20 millimeters thick?
No. The 20-mil measurement usually describes the wear layer. Twenty mil is approximately 0.5 millimeters. The overall plank thickness is listed separately, usually in millimeters.
Does thicker LVP always have a stronger locking mechanism?
No. Overall thickness is only one factor. Locking durability also depends on the core material, locking-profile design, manufacturing precision, subfloor support, and installation quality.
Why do low spots damage LVP flooring?
Low areas can allow the flooring to flex vertically when people walk across it. Repeated movement places stress on the locking edges and may eventually cause noise, gaps, raised edges, or broken joints.
Should baseboards be removed before installing LVP?
Removing the baseboards often creates the cleanest result, but shoe molding may be used in some homes. The right option depends on the existing trim, expansion requirements, appearance, and project budget.
Why would plywood be installed underneath LVP?
Plywood underlayment may be used to create a suitable installation surface or raise the finished floor elevation after thicker carpet, tile, or hardwood is removed.
Can LVP be installed directly over the existing floor?
Sometimes, but only when the existing surface is stable, clean, dry, flat, compatible with the selected product, and permitted by the manufacturer. Existing height, door clearances, transitions, and trapped moisture must also be considered.
Can floating LVP be installed underneath kitchen cabinets?
Many floating-floor manufacturers do not permit permanent cabinets or islands to be installed directly over the flooring because fixed objects can restrict movement. The instructions for the selected product should be reviewed before installation.
Why does LVP stair installation cost more?
Every tread, riser, and stair nose must be prepared, measured, cut, fitted, and finished individually. Stair noses, exposed edges, landings, and custom fabrication also increase material and labor requirements.
Is waterproof LVP completely waterproof?
The plank itself may resist water, but the entire installation is not automatically waterproof. Moisture can travel around the perimeter, through transitions, beneath the floor, and into the subfloor.
Is DIY LVP flooring installation a good idea?
DIY installation may be practical in a simple room with an installation-ready subfloor. Whole-house projects involving preparation, stairs, doorways, transitions, trim, floor-height differences, or connected rooms carry significantly more risk.
How should homeowners compare LVP flooring installation quotes?
Compare demolition, disposal, subfloor preparation, trim, transitions, stairs, furniture, appliances, warranties, and exclusions. The advertised square-foot rate does not always represent the complete project cost.
Get an LVP Quote Based on the Actual Condition of Your Home
The final vinyl plank flooring installation cost should reflect the existing condition of the home and the finished result you expect—not only the number of square feet.
At Bezruchuk Inc., we evaluate the subfloor, finished floor height, doorways, transitions, baseboards, stairs, furniture, appliances, and selected LVP product before developing the project scope.
Identifying these conditions before installation helps prevent unexpected charges, visual problems, and avoidable flooring failures.
Explore our flooring installation services to learn more about professional LVP installation, hardwood flooring, engineered flooring, laminate, stairs, trim, and subfloor preparation.
Contact Bezruchuk Inc. to schedule an on-site flooring evaluation and receive a detailed proposal based on the actual conditions of your project.